Spot instances on AWS are up to 90% cheaper than on-demand instances.
For example, on-demand m4.large (8 GB of RAM, 2 vCPU) instances cost $0.12/h or $90/month but spot prices are typically less than $0.02/h which is $15/month.
The catch is that they can be terminated at any time.
If it's OK if your webapp or service is offline for a while, then the cost savings can be very tempting.
In my case, there was an internal service that I wanted to run only during work hours.
If your app has state, you will probably want to preserve it when a spot instance is killed and then recreated. On AWS, you can store data on EBS volumes which are like external disks that you can attach to any instance. So you could simply reuse that volume when you launch a new spot instance, right? Unfortunately, it's not that simple.
Solutions
Not possible to choose root disk
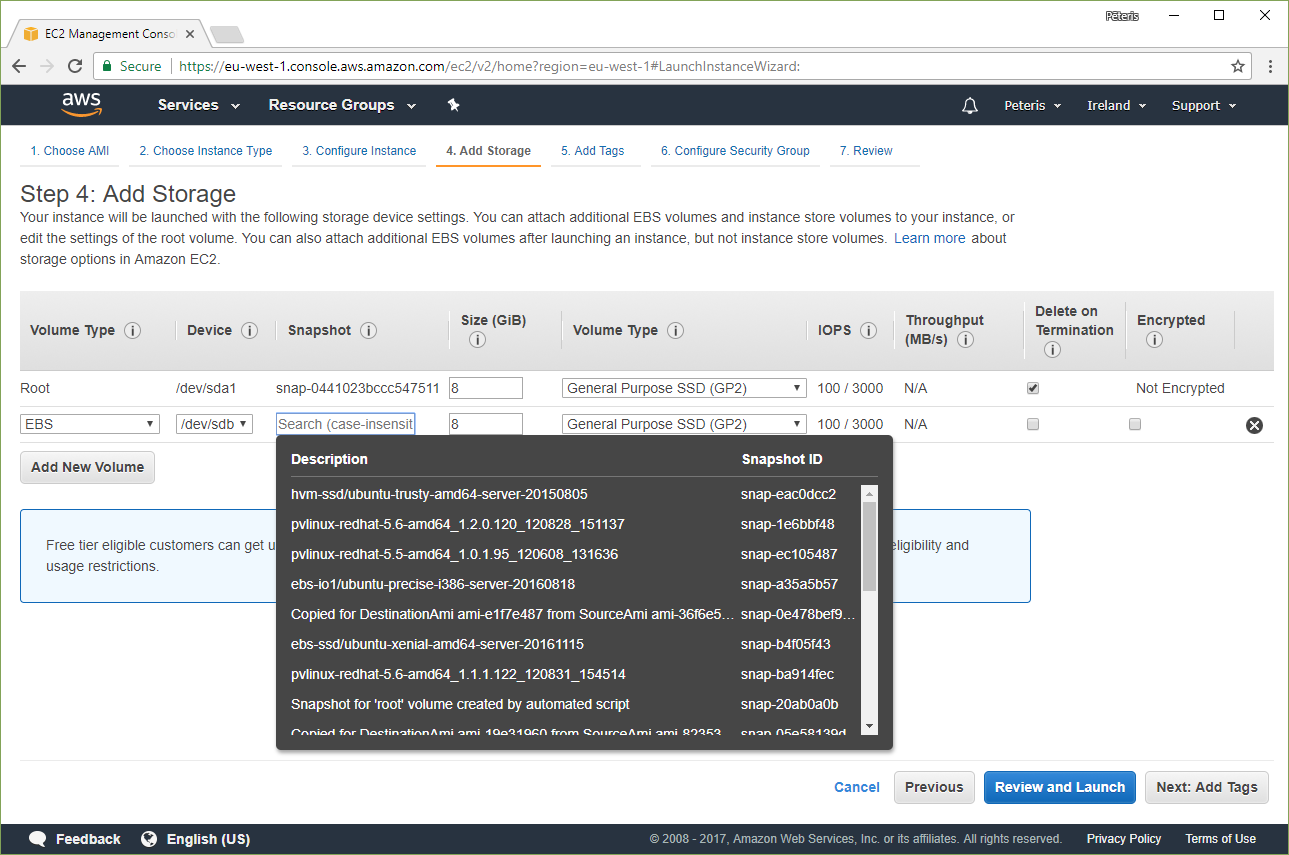
When you launch a new instance (be it on-demand or spot), you can't select an existing volume as the root disk. Instead you have to choose an AMI (Amazon Machine Image). They can be created from a snapshot that can in turn be created from a volume.
Converting volumes to AMIs is a slow process and not something we want to do.
Stop, replace root disk, start
If you use on-demand instances, you can stop them, detach the created root volume, attach your existing volume and start it back up. But this doesn't work for spot instances. While you can restart them, stopping them is the same as terminating them.
So we'd like to get that reusable volume to be the root of our system without having to stop our spot instances.
Mount, chroot
It is possible to attach an existing volume to a running instance and then mount it.
One problem with this is that you may have problems starting services that expect to be in / not /mnt/disk.
There's chroot /mnt/disk but it won't always work.
ec2-spotter is a utility that does this. It looks like it uses user data to run a script at boot time to replace the root disk and chroot into it.
Termination behavor: stop
Since September 18, 2017 if you use persistent spot requests, you can change the termination behavior to Stop instead of Terminate. Your instances will be stopped until new ones can be created. All volumes and even the instance ID will be preserved. Read more about it in the announcement.
But this won't work with one-off spot instances like in my case.
Docker containers
I propose running everything in Docker containers and storing the Docker data on an external volume.
When a new spot instance is created, all we have to do is attach it and mount it at /var/lib/docker.
That's what I'm going to talk about in this blog post.
Docker
Make sure to start the spot instance in the same availability zone as your volume. If you need to launch a spot instance in another availability zone, you'll have to create a snapshot of your volume and then create a new volume from that snapshot in the other availability zone.
We are going to use Ubuntu 16.04 for this. We need AWS CLI tools and jq.
sudo apt install -y awscli jq
First, create a volume that you want to reuse.
You can do it in the AWS Console or with this command:
VOLUME_ID=$(
  aws ec2 create-volume --volume-type gp2 --size 20 \
   --region $(curl -s http://169.254.169.254/latest/dynamic/instance-identity/document | jq -r .region) \
   --availability-zone $(curl -s http://169.254.169.254/latest/meta-data/placement/availability-zone) | jq -r .VolumeId
)
Then attach this volume to your spot instance.
aws ec2 attach-volume --device /dev/xvdf \
  --volume-id $VOLUME_ID \
  --instance-id $(curl -s http://169.254.169.254/latest/meta-data/instance-id) \
  --region $(curl -s http://169.254.169.254/latest/dynamic/instance-identity/document | jq -r .region)
Create a file system.
sudo mkfs.ext4 /dev/xvdf
Mount it at /var/lib/docker.
sudo mkdir -p /var/lib/docker
sudo mount /dev/xvdf /var/lib/docker
Install docker.
curl -fsSL get.docker.com | sudo bash
That's it.
To demonstrate that it works, let's run a service. We are going to use GitLab as an example.
sudo docker run --detach \
  --hostname `hostname` \
  --publish 80:80 --publish 443:443 --publish 2222:22 \
  --name gitlab \
  --restart always \
  --volume gitlab-etc:/etc/gitlab \
  --volume gitlab-log:/var/log/gitlab \
  --volume gitlab-opt:/var/opt/gitlab \
  gitlab/gitlab-ce:latest
We can see that it's running:
$ sudo docker ps
CONTAINER ID   IMAGE                     STATUS                             PORTS                     NAMES
787df39b279b   gitlab/gitlab-ce:latest   Up 27 seconds (health: starting)   0.0.0.0:80->80/tcp, ...   gitlab
It takes a minute to start. Then open the IP address in your browser, set a password, log in, create a test project in GitLab.
You can see the logs with sudo docker logs gitlab -f.
Finally, terminate the spot instance with
sudo halt
Alright, it's time to see if it worked.
Launch a new spot instance and run this:
sudo apt install -y awscli jq
export VOLUME_ID=vol-0d77dd43c8a00576b
Attach the volume exactly like we did it before.
aws ec2 attach-volume --device /dev/xvdf \
  --volume-id $VOLUME_ID \
  --instance-id $(curl -s http://169.254.169.254/latest/meta-data/instance-id) \
  --region $(curl -s http://169.254.169.254/latest/dynamic/instance-identity/document | jq -r .region)
Mount it.
sudo mkdir -p /var/lib/docker
sudo mount /dev/xvdf /var/lib/docker
Install Docker.
curl -fsSL get.docker.com | sudo bash
GitLab should be running:
$ sudo docker ps
CONTAINER ID   IMAGE                     STATUS                             PORTS                     NAMES
787df39b279b   gitlab/gitlab-ce:latest   Up 13 seconds (health: starting)   0.0.0.0:80->80/tcp, ...   gitlab
It takes a minute to start, but you should be able to access GitLab again and see the test project that you created.
CoreOS
If all you're going to do is run Docker containers, you might as well use a Linux distribution that only has Docker installed on it. One such distribution is CoreOS.
You can find the list of CoreOS AMIs here: https://coreos.com/os/docs/latest/booting-on-ec2.html
Note that the SSH user is core.
Attach the volume with
docker run --rm \
  -e AWS_ACCESS_KEY_ID=xxx \
  -e AWS_SECRET_ACCESS_KEY=xxx \
  xueshanf/awscli \
  aws ec2 attach-volume --device /dev/xvdf \
  --volume-id $VOLUME_ID \
  --instance-id $(curl -s http://169.254.169.254/latest/meta-data/instance-id) \
  --region $(curl -s http://169.254.169.254/latest/dynamic/instance-identity/document | jq -r .region)
Because Docker is already installed and started, you need to stop it before mounting the volume and then start it again.
sudo systemctl stop docker
sudo rm -rf /var/lib/docker
sudo mkdir -p /var/lib/docker
sudo mount /dev/xvdf /var/lib/docker
sudo systemctl start docker
Tips & tricks
Storage drivers
If you followed the instructions on Ubuntu first and then tried to attach the volume on CoreOS, you may find that you don't see the containers you created.
It's probably because CoreOS is using the overlay2 driver but Ubuntu is using aufs or something. https://docs.docker.com/engine/userguide/storagedriver/selectadriver/#supported-storage-drivers-per-linux-distribution
You can set up overlay2 driver with Ubuntu but in my experiments I found that it may not work.
sudo mkdir -p /etc/docker
echo '{ "storage-driver": "overlay2" }' | sudo tee /etc/docker/daemon.json
curl -fsSL get.docker.com | sudo bash
sudo usermod -aG docker $USER
AWS CLI in Docker
Running docker run --rm xueshanf/awscli aws ec2 ... with your AWS access keys can be dangerous. What if the maintainer of this Docker image is stealing your access keys?
You can easily create your own image with this Dockerfile
FROM python:3.6-alpine
RUN pip install awscli
ENTRYPOINT ["aws"]
Then build it
docker build -t aws .
And then run it like this
docker run --rm aws --version